Monday, 7 October 2019

Introduction to HTML Day 7

This is the PDF collection of cheat codes for the Tables unit.

In order to continue working with tables, I was provided with a 'cheat code' of sorts so I could remember what each thing did. 

I learned that <thead> vs <tfoot> were important for designing nice-looking tables, especially when you added different colours and fonts. 

Next I would be provided with the sorely needed PDF of cheat codes for the <select>,<label> and <input> tags. 

Introduction to HTML Day 6

Burger Project

I was throw right into it this time with another project. I had to make an interactive 'pick your burger' website. The <section>, <label> and <input> tags were definitely the hardest for me to wrap my head around. 

The <section> tag dictated The difference in spacing between 'what type of protein would you like' and 'how many patties would you like'. It had to be in the class "protein" so the computer would know which section to input the answer too. 
The <label> was the words showing up before the input text box. In order for it to be linked to the text box, the 'for' addition was used, and the id of the text box was inputted. If you skipped that step, the computer would not know what the label was for. 
The <input> was the text box, which was what you would be interacting with. It had to be very specific, since the input was a complete variable. The 'type' specified that it would be a text box. It needed a name and an id in order to communicate with the label and the computer. 
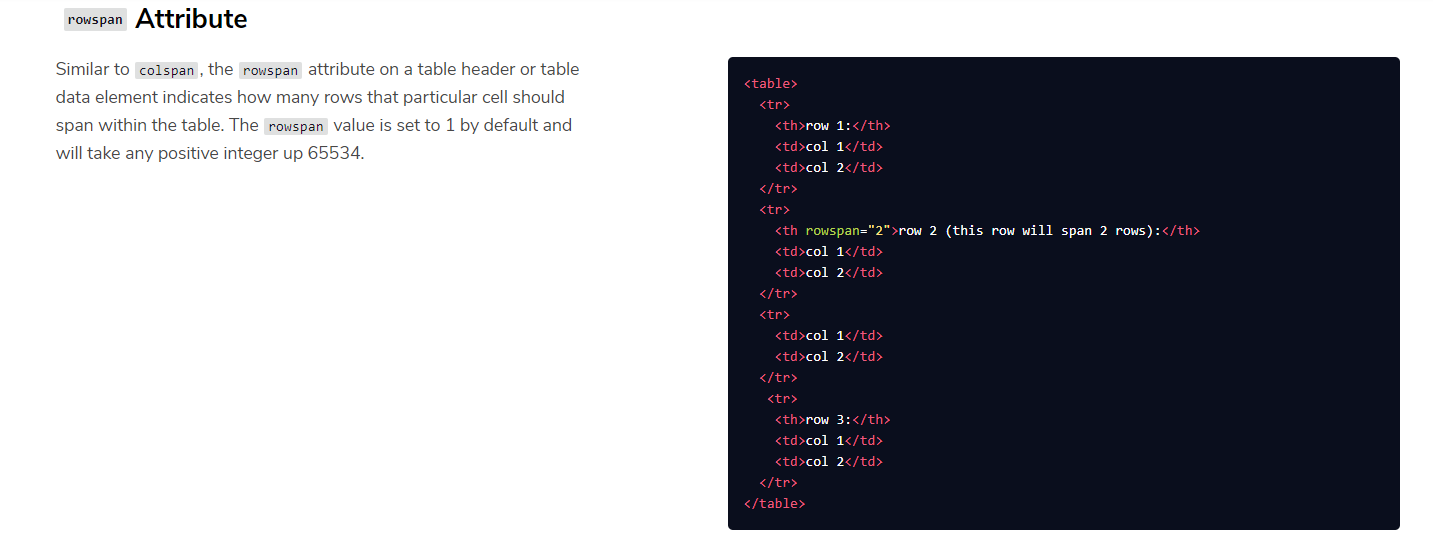
The 'span' option of input had set values which you had to specify. For instance, the min and max had to be numbers, not just names, so that you could clarify that they could move the slider up and down at '1' intervals. For instance, if the min is 1 and the max is five and the slider intervals were +-5, it could be either or but not in between. If the interval had a value of +-1, then there were up to 5 options. I gave the interval a value of '3' so that there were three options. 
The 'checkbox'es were easy, you gave them a name and id, and the value was what the computer read. 
For the dropdown menu, there was no <input> function involved. It went straight from <label> to <select> to <options>. The <select> tag was what the website veiwer interacted with, the <option>s were the words in the dropdown menu. 

Moving on I would get a hard copy of what I had learned so far. 

Introduction to HTML Day 5

Wine Festival Project

The wine festival project was probably the easiest of all. I needed to set up a pretty invitation that had its own URL. I did learn how to remove walls in a row, using the colspan="" addition. 

Moving on, it would get more interactive. The next unit was on switches, buttons, and sliders. 

Introduction to HTML Day 4


Tables, Rows and Columns

Tables are very important to be able to organize your information, especially pictures and numbers so that everything looks pretty. 

CodeAcademy set up a website with shipping orders for me to use. I had to make columns referring to the Company doing the shipping, the Number of Items, and what needed to happen Next to finish the transaction. 

To do this I learned about the <table> tag. The tag only works when you put in the correct guts, namely the <thead> table head, <tr> which designated a column, <th> and row content tags. Interestingly with tables, the first row has <th> for its content, while the next rows have <tr>. It works that way because those contents are all the column headers. 

Rows run horizontally, columns run vertically. That was very hard to remember. 

Next I would get to practise with another project. 

Wednesday, 2 October 2019

Introduction to HTML Day 3


Project Time

It was time to venture out on my own with this project. The goal? To make a blogpost about New York Fashion Week. In order to demonstrate everything I had learned so far, I had to insert pictures and paragraphs, as well as link each topic in my introduction to the blog post. 

I learned that New York Fashion Week showcases the strangest fashions. 
Also, it's just a lot of the same tags over and over. 
I used unordered lists and identity tags to link to the topics in my blog. 
Identity tags were probably among the greatest things I learned about. 
Using an identity tag, you can put links in your article by using the <a href="#"> tag, as long as you also used that tag to identify the link; id="". 

Next I will be moving on to learn about tables. 

Introduction to HTML Day 2

Today I learned how to set up the HTML and organize it, instead of just what HTML is and does. CodeAcademy has a unique 'hands-on' kind of learning. Instead of just telling me that !DOCTYPE html communicates with the internet browser when you make a website, they directed me to make a website and play around with it. 

I learned the importance of the tags in coding. Coding can get very complicated, very fast. Tagging things specify what will be read by the browser, where it will appear, and how. I learned how to make headers, titles and paragraphs, as well as insert pictures. 

Next, I will be working on my first project; setting up a blog. 


Friday, 27 September 2019

Introduction to HTML Day 1

I have started the course on Code Academy called Introduction to HTML. I completed the first learning module and have learned several elements to coding. I learned how to use tags properly, how to seperate text within my HTML code to keep everything organized, how to link to pictures, how to link to videos, and several cosmetic things relating to those.

The tags I learned about were body tags, div tags, headline tags, paragraph tags, text tags, list tags (both ordered and unordered), image source tags and video source tags.
I also learned how to size both images and videos, and add video controls all within the HTML of a document.

The next thing I will be working on is the second learning module within the course. It has 14 parts and relates to the HTML document standards.