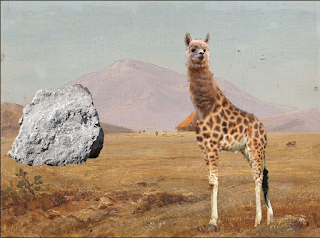
So you want to morph two innocent animals into some horrifying hybrid creation. That's messed up. Here's how you do it. No, put away the chainsaw, we are doing this with photoshop.
1. Pick your victims. Pick two animals you want to morph. They can be as similar or as different as you want, but keep in mind your skill level and sick interests. I also like to pick a completely seperate background because it just makes life so much easier.
2. Set your background as the background. Label it background. Congratulations now you have a background! Take your base animal (the body) and put it in the frame. You can label it body if you're very strange. I labeled it giraffe.
3. Cut your body out of the background. Also go right ahead and sever the head; we won't be needing that.
You could leave it like that if you really wanted to and claim you blended a giraffe and an invisible mole.
4. Now we put in our second picture; the alpaca. A beautiful animal, really.
5. Again we get to use our magic wand, unfortunately it's still for this and not to make hot chocolate.
You're going to want to set the alpacity back to 100% and cut out the background and the alpaca's body. It's already looking pretty good, if not a little confused.
6. You can do smudging and blurring to make it look more realistic, like the scar tissue has already healed and the animal has adjusted to its new circumstances.
Great! You can barely tell anything has changed and it looks like you spent 3 minutes zoomed in until your eyes crossed for nothing!
7. It's time to do the finishing touches. Using the shortcut Ctrl (or Command) U open up the saturation section and adjust the colours to make it look more natural. You're done! But wait, what's with the misplaced boulder? Is this going to be another dinosaur-era destruction where the universe realized it made a grave mistake?
Nah, I just thought the canvas looked a little empty.
8. Add in whatever you think the picture is missing to make it a bit interesting and distract from your abomination (especially if you made any mistakes).
|
|
|---|
On a seperate layer I added smudges of color on the base of the rock that was supposed to look like grass.
9. And you're done! Feel like Dr. Frankenstein yet? Try writing a tutorial on it and then you will for sure!
By Isabella's Herding Cats


No comments:
Post a Comment